|
|
TITLE |
||
|
|
|||
|
DOCUMENT ID |
Creating,
Approving, and Using Permits in ePAS |
||
|
|
|||
This Manual covers an introduction and familiarization to creating and using permits in ePAS.
ePAS features include:
· Registered Routine Duty (RRD)
· Minor Works Permit (MWP)
· Permit to Work (PTW)
· Permit Management
The first step in the workflow for generating a permit is the Permit Request. This step is completed initially for all the different work package options, i.e. RRD, MWP, or PTW.
The Permit Request is part of the process where a person with the Permit Requester System Role creates a request for permission to access plant. Typically, this is for performing work – maintenance, repair, or equipment assembly of fabrication.
A Permit Request is submitted by personnel whose job it is either to perform the work themselves, or alternatively is responsible for planning and coordinating work activities. The activities and hazards determine which type of permit will be issued.
A Permit Request is received by personnel responsible for assessing such requests, scheduling the work in relation to other work and operational requirements, and ensuring that the correct safety precautions and control measures have been considered.
Once a Permit Request has been assessed as complete (i.e. the task is correctly identified, the correct plant selected, and the Task Hazard Analysis completed), it is approved by a person with the Permit Request Authorizer System Role. The Permit Request Author can also approve the Permit Request that has been created with the Permit Request Authorizer System Role. Once approved, the system will proceed to the next step in the process, that is, an approved package of work for which a Permit and any identified Control Certificates may be created.
In addition to the above basic tasks, a user may also copy, amend, or delete a Permit Request.
This technical appendix covers the following tasks associated with a Permit Request and associated permits:
1. Creating a Permit Request
2. Submitting a Permit Request
3. Approving a Permit Request
4. Rejecting a Permit Request
5. Copying a Permit Request
6. Amending a Permit Request
7. Deleting a Permit Request
8. Creating Permit/s from an approved Permit Request
3.1.1
Identify the
work in accordance with standard procedures – Utilize task
lists, as appropriate (ATLis
or clone), to both plan and communicate the planned work. [Note: ALL electrical Class II and
above work will require an ePAS PTW with an Isolation Certificate (IC) or
Complex Isolation Certificate (CIC) that incorporates the relevant information
from the Operational Safety Procedure (OSP) or Temporary OSPs (TOSP).
Attachment of the OSP/TOSP is optional in the ePAS system documentation
section.”
3.1.2
Perform
preliminary planning for assigned tasks
3.1.3
Review lessons
learned and promote continuous improvement.
3.1.4
Hold yourself and others accountable for
staying within the guidelines of policies and procedures.
3.1.5
Ensure hazards
are analyzed prior to performing work.
3.1.6
Ensure all
documentation and approvals are obtained prior to performing work.
3.1.7
Ensure you
have adequate
and appropriate training in accordance with Jefferson Lab’s
requirements. Check for updates to training periodically.
3.1.8
Read and abide
by associated, approved Work Control Document (WCD). Ensure the WCD is up-to-date and
will not expire during the work (i.e. OSPs are 3 years, LOTO are for 12 months,
TOSPs are for less than 90 days, permits to work have varying expirations).
3.1.9
While working,
re-evaluate the scope and Task Hazard Analysis (THA) associated with a particular WCD if
appropriate.
3.1.10
Solicit and
provide feedback for future reference.
3.1.11
Help document
lessons learned according to your group, department, division and/or lab
procedures.
3.2
Work
Control Document
(WCD) Author/Creator
(ePAS)
3.2.1 Writes the correct TOSP, OSP, THA, LOTO, and/or ePAS permit to work/certificate
3.2.2 If the author is the lead worker, ensure all affected workers read, understand and sign associated documents.
NOTE: The Author/Creator may NOT have the
proper training or requirements necessary to perform the work. The
Author/Creator may NOT be the Lead Worker or any worker if the person has not
completed required lab and equipment specific training. In ePAS, the Creator
CANNOT be the Approver for a Permit to Work (PTW).
3.2.3 Define the Scope of Work.
3.2.4 Analyze the Identified Hazards.
3.2.5 Develop the Procedure to mitigate the hazard.
3.2.6 Document the approved permit and certificate.
3.2.7 Briefs the Recipient-in-Charge (RIC) on the Permit to Work (PTW).
3.3
Department
Heads/Divisional Safety Officers (DSO)
3.3.1 Responsible
for the oversight of the tasks being performed and the implementation of Work
Control Documents.
3.3.2 Shall be accountable for tasks staying within
the guidelines of policies and procedures.
3.4
Supervisor/Technical
Representative (TR)/Sponsor
3.4.1
Make sure proper documentation, Work
Control documents, and competencies are obtained and current by all Work Party
Members and the RIC for specific tasks.
3.4.2
Shall be accountable for staying
within the guidelines of policies and procedures.
3.4.3
Ensure that the RIC performs a Pre-job
Safety Brief.
3.4.4
Ensure that the RIC has the Work Party
Members sign in and out of the Signature Sheet and turns it in at the end of
the task when the PTW is Surrendered.
3.4.5
Oversee periodic audits of the LOTO
procedures to ensure that they are current with lab policies and requirements.
If audit results find that the procedures are not current, then the work being
performed shall be stopped with a STOP WORK in place until the procedure is
updated.
3.5
Recipient-in-Charge (RIC)- (staff-JLab
Employee ONLY who is responsible for ePAS permit/certificate and OSP
implementation)
3.5.1 The RIC IS the Lead Worker on the job being performed.
3.5.2 Shall be accountable for staying within the guidelines of policies and procedures.
3.5.3 Insure that the individuals are assigned specific tasks, have the appropriate training and competencies, and make sure that the Work Party Members assigned to the PTW sign in and out on the Signature Page.
3.5.4 Implement the approved permit/certificate.
3.5.4.1 Post the ePAS permit/certificate in-or-around the affected area.
3.5.4.2 Ensure affected personnel are aware of the procedure.
3.5.4.3 Verify the effectiveness of the procedure by job walk-throughs and procedure review.
3.5.5
Review
and update OSPs/LOTO-OSPs associated with the PTW prior to expiration and
whenever there is a change that affects the work activity (e.g., work group
reorganization or equipment upgrade). All LOTO-OSPs are subject to an annual
inspection.
3.5.6
Surrender
PTW upon completion of work.
3.6
Lead Worker (OSP)
3.6.1
Performs pre-job
safety briefing.
3.6.2
Work tasks
within controls.
3.6.3
Shall be
accountable for
staying within the guideline of policy and procedures.
3.6.4
Ensure all
affected workers read, understand and sign associated documents.
3.6.5
MUST be a lab
STAFF EMPLOYEE.
3.6.6
Can have a
“Co-Lead Worker” who can be staff or a user that is fully trained and qualified
in lab procedures and equipment.
3.7.1
Work within the tasks and controls.
3.7.2
Shall hold each other accountable for
staying within the guideline of policy and procedures.
3.7.3
Must read and understand the Work
Control Documents.
3.7.4
Must have the required training and
competencies associated with the job.
3.7.5
Must attend the Pre-job Safety Brief or
be briefed individually by the RIC.
3.7.6
Sign in and out of the Signature sheet
associated with the PTW (electronically or manually).
3.8
Environmental,
Safety, and Health (ES&H) Division
3.8.1
Assist organizations in providing
guidance with lab safety and training procedures and policies.
3.8.2
Assist organizations in implementing
this process.
3.8.3
Implement training and competencies.
3.8.4
Audit OSPs, Permits, and LOTOs, as
necessary.
3.8.5
Interpret and define safety policies
and industry standards.
3.8.6
ES&H shall enforce policy and
procedures, and perform investigations, as necessary.
4.1
Permit
Requests
The first step in the workflow for generating a permit is the Permit Request (PR). The Permit Request is the process whereby a person (Permit Requester) can request work on an item, its associated plant item, and associated Task Hazard Analysis to have that request reviewed and approved. A permit is not created or issued until the Permit Request has been approved by the Permit Request Authorizer.
The following diagram illustrates the Permit Request workflow:

The gathering of information for this Permit Request process is presented to users as an easy to use Wizard, consisting of the following steps:
4.1.1 General Details – Required Information: responsibility group, work group, and area where the work will be completed. Start Date and Expiry Date shall also be noted when creating the PR.
4.1.2 Plant & Work - Detailing the plant to be worked on, tools and equipment required and the scope of the work.
4.1.3 Cross Reference – details of any
Permits/Certificates linked to the same piece of plant, isolation point or lock
box.
4.1.4 THA - Used to select the types of work to be undertaken. It may also trigger several automated processes such as the requirement for a document or form to be attached, specific control certificates and additional approvals for types of work.
4.1.5 Recipients - Provides the ability to define the RIC(s) of the ensuing permit. The creator of the PR is automatically created as the RIC, this may be edited where required.
4.1.6 Documents - Provides the ability to attach any required documents, such as the Flooring/Hand Rail Removal Plan, etc.
4.1.7 Permit Summary - Identifies the permit type and nominated certificates and forms required for the work. Within ePAS there are many ways of creating a Permit Request.
Within ePAS there are many ways of creating a Permit Application. The available options include:
The available options include:
· Manual
Creation of a Permit Request.
· Copying
an existing Permit Request.
4.2 Manual Creation of a Permit Request
This section provides step-by-step instructions of how to create a Permit Request.
ePAS presents a blank form for population with the appropriate information by the user. Some fields are mandatory and must be completed before ePAS will allow the user to progress to the next step. These fields are clearly indicated by the Task Pad Indicators (horizontal black arrows) and the Mandatory Indicator (red asterisks).
Once the entry of all the informational details within the Permit Request is completed, the user can submit the request for approval.
To create a Permit Request, select the Create Permit Request action from the Permit Request menu or select the Create Permit Request shortcut from the My Shortcuts home page.

After selecting one of the two create Permit Request options, ePAS will display the Permit Request Record.
4.2.1 General Details Tab
The General Details screen is the first screen displayed. Creation of the Permit Request may be completed by utilizing the built-in wizard or by accessing the tabs located in the sidebar or a combination of both. The user can navigate through the pages of the wizard using the buttons located on each screen. Alternatively, users may prefer to work through the tabs located in the sidebar to complete the planning of the Permit Request.
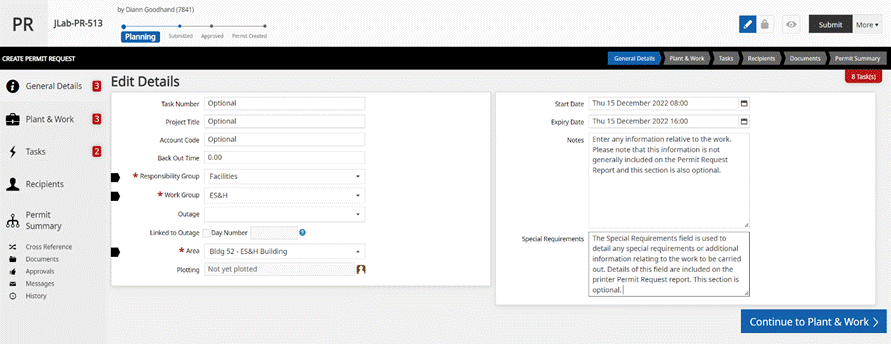
The fields included on the General Details Tab are detailed below. The required fields are represented by the red Asterix. Complete the fields as required from the list below.
Once the required fields are completed, select the blue Continue to Plant & Work navigation button located on the bottom right-hand side of the screen to navigate forward to the Plant & Work section.
|
Field
Name |
Description |
|
Task Number |
This is a free format text field which allows the user to
enter an optional task number, this may also be created from external asset
management system such as ATLis. |
|
Project Title |
This is a free format text field which allows the user to
enter an optional title of the project being completed. |
|
Back Out Time |
This field is used to define how long it takes to restore
the plant if the plant had to be restored unexpectedly. This information may
assist planners in risk evaluation. Enter these details, if required. |
|
*Responsibility Group |
The Responsibility Group (RG) is a dropdown list of
responsible areas (or groups responsible for areas). The Responsibility Group
chosen should be the group that has ownership or responsibility over the
plant to be worked on. Select the relevant Responsibility Group from the
drop-down list. |
|
*Work Group |
Select the relevant Work Group that will be carrying out
the work. The available Work Group are directly related to the selected
Responsibility Group. |
|
Outage |
The Outage field is an optional field that provides a
dropdown list of all active Outages for the defined Responsibility Group.
Where the planned works are to be associated with an Outage, select the
relevant Outage. *This section will not be used* |
|
Linked to Outage |
The Linked to Outage field provides the ability to link the
Permit Request and resulting permit to the defined Outage. Linking the record
to an outage is optional. Linking the record to the outage provides the
ability to perform date changes to all linked records in the case where the
scheduled date/s of the outage may change. |
|
Day Number |
The day number field automatically calculates the number of
days between the Outage start date and the defined start date of the Permit
when the record has been linked to the defined Outage. This information
provides a visual indicator of when the works are due to be carried out in
relation to the timeframe of the defined Outage. The day number may be manually changed, if required. This
action will update the defined Start Date and Expiry Date of the Permit
Request in line with the defined Outage dates. |
|
*Area |
Select the relevant Area that the work is to be located.
The available Areas are directly related to the selected Responsibility
Group. |
|
Plotting |
Click on the |
|
Start Date |
The Start Date field is used to identify the date and time
that the works are scheduled to begin. This field currently defaults to one
day in advance (tomorrow) at 8:00 a.m., but may be edited, as required. |
|
Expiry Date |
The Expiry Date field holds the date and time that the job
is expected to be completed. This field currently defaults to the Start
Date/Time value + 8 hours (e.g. 4:00 p.m.), but may be edited, as required. Note: The Permit has a maximum duration
of 30 days. |
|
Notes |
The Notes field is optional and can be used to enter any
general notes about the Permit Request or ensuing permit. Details in the
Notes field are not reproduced on the printed Permit Request report. |
|
Special Requirements |
The Special Requirements field is used to detail any
special requirements or additional information relating to the work to be
carried out. Details of this field are included on the printed Permit Request
report. |
4.2.2 Edit Plant and Work Tab
The Edit Plant & Work section represents where additional information will be inputted by the Permit Request Creator. This is also the section where Primary Plant Items (PPI) will be added and represented for the work being completed.

The required and extra detail fields included in the Plant & Work section are detailed below. The required fields are represented by the Red Asterix. These areas will be typed in by the Permit Request Creator. These required fields include the Title and Job Description. Once these sections are completed, the system will allow movement forward to add in the Primary Plant Item (PPI).
|
Field Name |
Description |
|
*Title |
The
Title field is a mandatory field providing the ability to enter a short title
of the work being completed. |
|
*Job
Description |
The
Job Description field is a mandatory field and provides the ability to enter
a detailed description of the works that will be carried out and may also
include process steps, safety information, etc. Clicking the Select button
located at the end of the field allows the user to select predefined Job
Description for consistency. This
information is printed on the Permit Request Report |
|
Tools
& Equipment |
The
Tools & Equipment field is not a mandatory field, but it can be used to
indicate when items such as Cranes or other equipment is required for the
work. |
|
Plant
Item Data Grid |
The
Plant Item data grid displays a list of all plant items related to the
permit. Details are auto populated following the selection of the plant to be
worked on. |
|
Previous
Lessons Learned |
The
data grid displays a listing of lessons learned that have previously been
recorded on other permits when working on the selected plant item(s) |
4.2.3 Adding Plant Items
To add Plant Items:
1. Select the blue Add Plant Items button to add plant items to the current work scope.

2. ePAS will automatically open and display the Select Plant Item for Work Scope screen. Please see second image below.
3. Select one or more plant items to be added to the current work scope by clicking on the box next to the plant item.
4. The Advanced Search option provides the ability to search for plant items such as Critical Plant, Confined Space Plant, temporary plant items, if required.
5. Search for, select the required plant items, and select the blue Add button; or
6. Select Cancel to close the Select Plant Item for Work Scope screen without adding the selected items.

ePAS returns to the Plant & Work tab once the blue Add button or the Cancel button has been selected. The selected item(s) are displayed in the Plant Item Data Grid that is pictured below.
Once the Primary Plant Item has been selected, it will be listed in the Plant Item Data Grid. This displays a listing of all plant items related to the Permit Request. Once all desired Primary Plant Items have been added, click on the blue Continue to Tasks button to continue forward. Information displayed, and functionality provided are detailed below:
|
Column |
Description |
|
PPI |
The Primary Plant Item (PPI) is used to identify the
Primary Plant Item being worked on where multiple plant items have been
specified. The first item selected is automatically assigned as the Primary
Plant Item. In most cases, the Primary Plant Item is the most significant
piece of plant being worked on. To change the PPI, select an alternate Plant Item by selecting the
corresponding radio button |
|
Equipment Number |
Displays the Equipment Number of the plant item |
|
Description |
Displays the Description of the plant item. Note: The Description column displays the
Equipment number and Description fields are linked together. |
|
Safety System |
This column indicates whether the plant item is part
of a safety system. |
|
Warnings |
The Warnings column may display additional text when
the selected plant item has been defined as: 9. Critical Plant 10. Confined Space 11. Passing Valve When any of these attributes are present, the column
is highlighted in red and the individual attributes are defined. This
information is also printed on the Permit Request report. |
|
Actions |
The Actions column provides the ability to delete a
plant item that has previously been added. |
4.2.4 Previous Lessons Learned Data Grid
The Previous Lessons Learned Data Grid displays a listing of all lessons learned recorded against any of the selected plant items. ePAS will display the last ten lessons learned recorded. The information is carried forward to the permit to also alert the permit planner to the information and allows the information to be considered during the permit planning process.
|
Column |
Description |
|
Selected |
Checkbox field enables the relevant
lessons learned to be selected. This indicates to the Permit Request Authorizer
and also the Permit Planners which lessons learned are deemed relevant to
this planned work. |
|
Permit |
Displays the permit ID of a previously
completed permit. |
|
Completed Date |
Displays the date the permit was
completed. |
|
Plant Item |
Displays the plant item that the lessons
learned is recorded against. This will
be relevant where multiple plant items are listed as the plant to be worked
on. |
|
Lessons Learned |
Displays the previously recorded lessons
learned. |
4.2.5 Additional Information Regarding Selected Plant Item(s)
ePAS is configured to generate the following additional actions where the Plant Items selected have been defined with specific plant attributes. These are not common for most areas where work is being completed. If the Primary Plant Item has one of the below listed attributes, it will be represented once the PPI has been selected and added into the Plant Item Data Grid. Examples of these are detailed below:
4.2.5.1 Critical Plant Items
On selection of a Plant Item that is defined as Critical Plant:
·
The
Warnings column indicates that it is
Critical Plant.
·
The
Warnings column is highlighted in
red.
·
The
wording Critical Plant is displayed
against the Plant Item in red text
on all reports.
·
Drive
the requirement for an additional approval point on the Permit to Work.
4.2.5.2 Confined Space Plant Items
On selection of a Plant Item that is defined as Confined Space:
·
The
Warnings column indicates that it is
a confined space item.
·
The
Warnings column is highlighted in
red.
·
The
Working in Confined Spaces Work category is automatically applied to the THA.
·
The
wording Confined Space is displayed
against the plant item in red text on all reports.
·
Drive
the requirement for an additional approval point on the Permit to Work.
4.2.5.3 Safety System
On selection of a Plant Item that is defined as part of a Safety System:
·
The
Safety system column indicates that it is a Safety System plant item.
·
The
wording Safety System is displayed
against the plant item in red text on all reports.
4.2.5.4 Passing Valve Plant Items
On selection of a Plant Item that is defined as Passing Valve:
·
The
Warnings Column indicates that it is
a Passing Valve.
·
The
Warnings column is highlighted in
red.
· The wording “Passing Valve” is displayed against the plant item in red text on all reports.
4.2.6 Deleting Plant
Plant Items may also be deleted, if identified as being incorrect during the planning process.
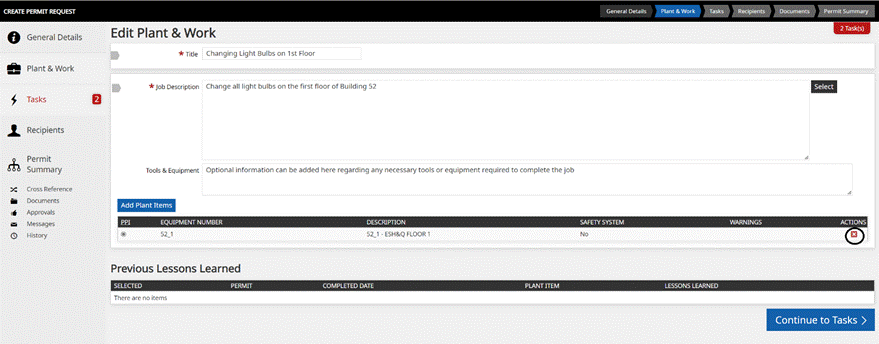
To delete Plant Items:
1.
Select
the corresponding red delete icon located in the
Action column of the data grid
2.
Acknowledge
the deletion of the plant item by selecting the OK button from the acknowledgement message box that appears on the screen.
Alternatively, selecting the Cancel
button will abort the deletion process.
The Plant Item is deleted from the permit. The History tab records full details of the plant item deletion.
4.2.7 Cross References
|
|
The Cross Reference
Permit Requests screen is displayed when any of the Plant Item(s) selected are associated with other Permit Requests, Permits, or Certificates
that are displaying a conflict or potential conflict only. Where the Plant Items are shared and have no
conflicts, the user is not directed to the Cross Reference screen. |
·
Conflicts: This category indicates cross references with
permits/certificates that are currently on issue or isolated. Until the listed
permits/certificates are surrendered this permit/certificate will be prevented
from proceeding.
·
Potential Conflicts: This category indicates
cross references with permits/certificates that are not currently issued or
isolated but have conflicting conditions.
·
Shared Items: This category lists
permits/certificates that share the same plant items or isolation points, but
are not currently in a conflicting state.
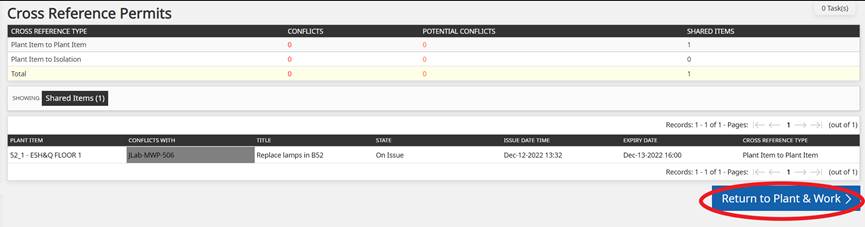
Full permit/certificate details are displayed under the associated tabs listed below the summary data grid. Navigation to the listed permits/certificates remains accessible via selection of the relevant permit/certificate displayed in the data grid.
Selection of the blue Return to Plant & Work navigation button returns the user to the Plant & Work tab of the Permit Request.
Once located back on the Plant and Work tab, select the blue Continue to Tasks navigation button located on the bottom right-hand side of the screen to navigate to the Tasks tab; alternatively, select the Task tab located in the sidebar of the screen.
4.2.8 Adding Temporary Plant Items
Temporary Plant Items may also be added if the required Plant Item is not available. Once a Temporary Plant Item is added, it can be located in the Temporary Plant Items drop down section in the Select Plant Item for Work Scope section.
To add a Temporary Plant Item:
1. In the Select Plant Item for Work Scope section, scroll to the very bottom of the page and locate the Temporary Plant Items tab.
2. Click on the blue (Details) marker next to the Temporary Plant Items tab.
3. Once the (Details) section opens, click on Add Temporary Plant Item. This will open a screen to fill out additional information regarding the desired Temporary Plant item.

4. The Create Temporary Plant Item screen will open automatically. The red Asterix determines the required information that must be entered into the system. Any and all additional information can be entered as well, ex: Plant Location, Is the Plant Item an Isolation Point, etc.
5. Fill out the required and any extra desired information and select the blue Save button to add the Temporary Plant Item into the database. Subsequently, the Cancel button can be selected to cancel the addition of a Temporary Plant Item.

Once the Temporary Plant Item is saved, it will be loaded into the database under the Temporary Plant Items section. Now the added Temporary Plant Item can be selected as the Primary Plant Item (PPI).

To move forward into the Tasks section display, select the blue Continue to Tasks button, once all desired plant items have been entered.
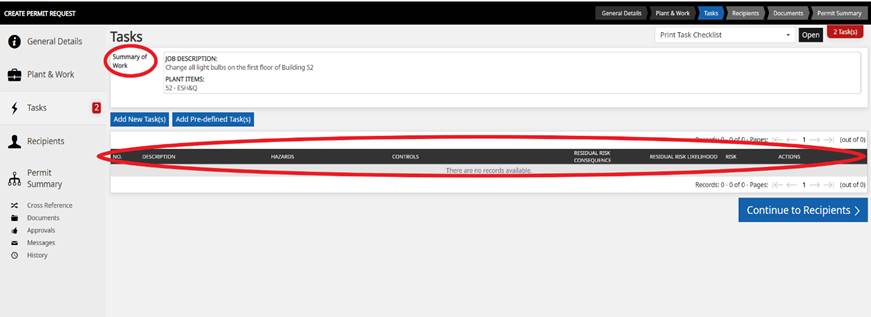
4.3 Tasks Tab
Tasks provides the ability to adopt a task-based approach to the identification of hazards and controls for the work being completed. This feature provides the ability to define tasks, define the types of work for each task, and to perform risk assessment against each defined task.
|
|
ePAS provides many options for performing risk
assessment within the THA: 1.
No Risk Assessment performed (check the Heading (No Risk Assessment) box) 2.
Single Risk Assessment for whole job 3.
Risk Assess individual tasks 4.
Risk Assess each hazard |
4.3.1 Task List
The Tasks tab contains the following fields and associated information:
|
Field |
Purpose |
|
Summary of Work |
This is a
non-editable field that provides the context of the work being assessed. The
options displayed here are controlled via the “Controls the data from
selected fields which are to be displayed in the THA Summary field” setting. |
|
Task Data Grid |
Displays
the Tasks that have been added to the Task tab and provides the ability to
add tasks (both standard and pre-defined) and to sort the tasks. |
The Tasks tab displays a non-editable task data grid with the following columns:
|
Column |
Purpose |
|
Number |
This column displays the task number.
This is a sequential number that is automatically applied to each task. This
number cannot be directly updated by the user, but is updated when the user
sorts the tasks. |
|
Description |
This column
displays a description of the task. Where the Task is a Header task only, the
description is displayed in bold text. |
|
Hazards |
This column displays the associated hazards to the
chosen work category. |
|
Controls |
This column displays the associated controls for the
hazards. |
|
Actions |
This column displays a series of icons
that can be performed on the task. |
4.3.1.1 Add a New Task
1. Select the blue Add New Task(s) button located on the Tasks Screen.
2. The Add New Task(s) window is displayed, see second image.
3. Create the required Tasks and select the blue Save button. Each task is a step. DO NOT COMBINE TASKS OR STEPS.
4. The Task screen is updated to include the created tasks, see third image.

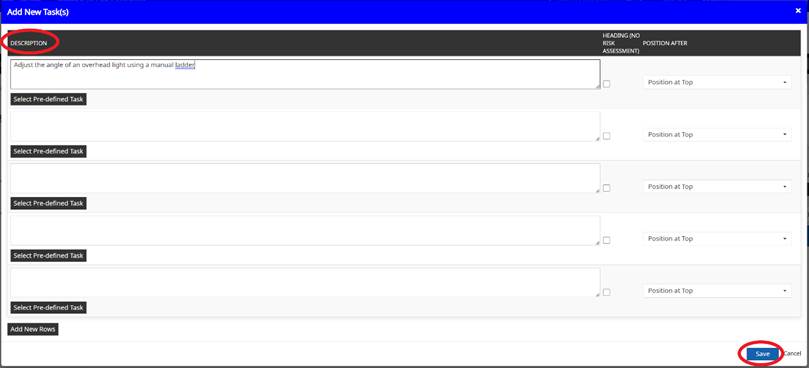
The Add New Task(s)
popup window allows the user to quickly add one or more tasks or pre-defined
tasks to the Permit Request without having to add in the THA data requirements
at that time. When manually writing in tasks, this field should be detailed.
The Add New Task(s) popup window displays the following fields and associated functionality:
|
Column |
Purpose |
|
Description |
Provides the ability to enter a detailed
description of the task and allows for entry of up to 4000 characters. |
|
Select Pre-defined Task button |
Selection of the
button navigates the user to the Search Pre-defined Tasks screen to search
for and select a pre-defined task(s) deemed suitable for the work scope. |
|
Heading (No Risk Assessment) |
Selection of the check box will flag the
task as a heading only. Heading only
tasks do not require a Risk Assessment to be completed and are displayed in
Bold on the Tasks data grid and Task Checklist Reports to easily distinguish
between a task and a task heading. |
|
Position After |
This field
provides a dropdown list allowing the user to select the position for the
newly added task. The new task will be inserted immediately following the
selected option. The Position After dropdown list contains a standard
Position at Top option, and also a value for each existing task saved against
the object. |
|
Add New Rows |
By default, the system will display 5
rows allowing the user to enter 5 new tasks at the same time. Should additional tasks be required to be
added at the same time, select the Add New Rows button to add another 5 new
rows. This button can be selected
multiple times providing the ability for the user to define all the tasks
associated with the work scope |
|
Save |
Selection of the
Save button will add the new Task(s) to the object and navigate the user to
the Edit Task window for the first task.
The addition of the new task is recorded under the History Tab |
|
Cancel |
Cancel option will close the popup
window without adding any new tasks. |
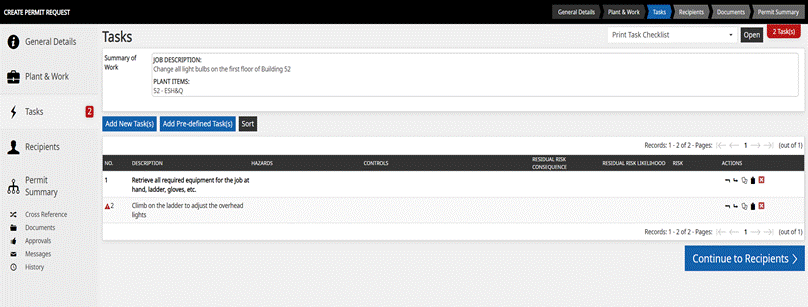
This is how the Tasks section should appear once all required information has been entered for the desired job. [Note]: Task Number 1 does not have a represented Red Triangle due to this specific task not requiring a Task Hazard Analysis. This specification is described above, under the Heading (No Risk Assessment) definition.
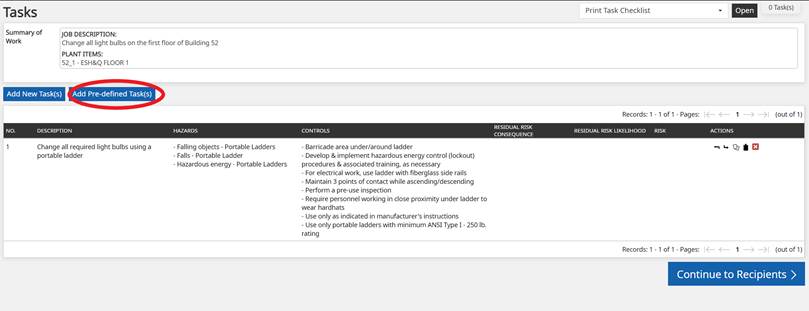
4.3.2 Add Pre-Defined Tasks
ePAS also provides the ability to create a library of Pre-defined Tasks. These tasks can then be used by all users when performing their task analysis and risk assessment.
To add Pre-Defined Tasks:
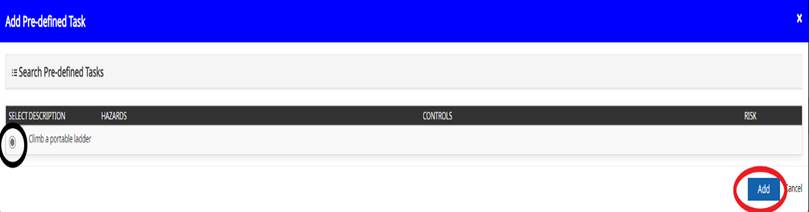
1. Select the blue Add Pre-defined Task button located on the Tasks tab. See first image.
2. The Add Pre-Defined Task(s) window is displayed allowing the user to search for the required task(s). This can be done by either typing in a known Description, or, by using the drop-down menus for Work Category, Hazard, or Control. See second image.
3. Enter the search criteria and select the blue Search button to execute the search.
4. Mark the relevant Pre-defined task and select the blue Add button to add the task. See third image.

4.3.3 Tasks
The Task screen displays the complete lists of tasks that have been entered for the required work. This is where the THA will be built from.
To access a task to move forward into the THA, select the task from the Tasks screen data grid where the associated red triangle is located and click on the red triangle to continue forward.

4.3.4 Task Hazard Analysis
The THA is a structured risk assessment tool which involves identification of several components:
·
The
work categories (types of work) being performed; for example, scaffolding or
electrical work.
·
Hazards
or dangers present when performing the work; for example, airborne sparks.
·
Control
measures taken to control (reduce or eliminate) the dangers involved in doing
the work.
·
Custom
Hazards and Controls may also be added where required to adequately define the
controls and hazards to be implemented.
|
|
All Permit Requests require a THA containing at least one Work
Category. |
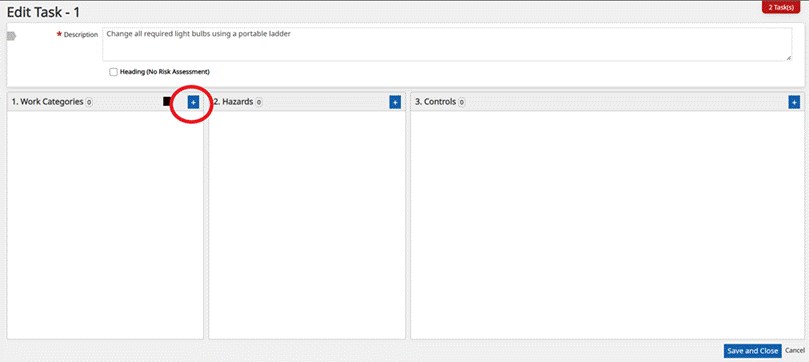
The Edit Task-1 screen displays the section where the THA is built. This is where the selection of Work Categories will occur for the job that needs to be completed. [Note]: It is important to remember to select all applicable Work Categories for a job being performed, i.e. confined space, thermal, etc. The selected Work Categories will populate all the hazards and controls that are necessary for the job being performed.
4.3.5 Work Categories
Selection of specific Work Categories may initiate some automatic processes such as:
·
The
permit type required for the work.
·
Any
required documents on either the Permit Request or the Permit.
·
Any
required relationships for the Permit.
·
Whether
any forms are required (Signature Sheet, Hot Work, etc.) for the Permit.
·
Whether
additional approvals are required on the Permit.
·
Whether
additional emails are to be generated to specific officers due to the nature of
the work throughout the permit workflow.
4.3.5.1 Adding Work Categories, Hazards, and Controls
1. Add a Work Category by selecting the blue + button in the 1. Work Categories section. ePAS displays the Add Work Category Selection dialogue box.
2. The Work Categories are notated by different images. Select the Work Category image that fits work being performed.
3. Once a Work Category is selected, there will be additional, more detailed options that appear for selection, ex: Select Work Category Elevated Work, list of detailed work is populated. Select the checkbox beside one or more categories to be added to the THA.
4. Alternatively, use the Search field to search for a category containing the specified text to filter the work categories and then select the checkbox.
5. Select the blue Add button to add the selected categories to the THA; or
6. Select the Close button (X in the top right corner) or Cancel button to close the dialogue box without adding the selected items.
7. If required, remove a previously selected Work Category by selecting the red X beside the category.
8. Add additional hazards by selecting the blue + button in the 2. Hazards section.
9. ePAS displays the Hazard Selection dialogue box.
10. Select the checkbox beside one or more hazards to add those hazards to the THA.
11. Use the Search field to search for a hazard containing the specified text.
12. Select the blue Add button to add the selected controls to the THA; OR
13. Select the Close button (X in the top right corner) or Cancel button to close the dialogue box without adding the selected items.
14. If required a Custom Hazard may also be added to the Permit Request via the Add Hazards window.
15. To remove a hazard previously added, select the red X beside the hazard.
16. Review any controls that have been automatically added based on the Work Categories selected.
17. Add additional controls by selecting the blue + button in the 3. Controls section.
18. ePAS displays the Control Selection dialogue box.
19. Select the checkbox beside one or more controls to add those controls to the THA.
20. Optionally, add a custom control by selecting the Custom Control Type button at the end of the selection list and typing a description in the Custom Control text box. Custom controls are shown in the list in italics and with an asterisk at the start.
21. Alternatively, use the search field to search for a Control containing the specified text.
22. Select the blue Add button to add the selected Controls to the THA; or
23. Select the Close button (X in the top right corner) or Cancel button to close the dialogue box without adding the selected items.
24. To remove a control previously added, select the red X beside the control.

4.3.6 Add Custom Hazards
ePAS provides the ability to add a Custom Hazard to the task in the event that a suitable hazard is not available. A report is available to Global System Administrators via the THA System Maintenance menu to report on and action any Custom Hazards added.
This action is completed by selecting the blue + button located next to the 2. Hazards located on the Edit Task page. Once the below screen is open, add in the hazard in the Custom Hazard box and then click the blue Add button.


When the Custom Hazard has been created it is displayed in italics on both the screen and within the Task Checklist report.
4.3.7 Add Custom Controls
ePAS provides the ability to add a Custom Control to the task in the event that a suitable control is not available. A report is available to Global System Administrators via the THA System Maintenance Menu to report on and action any Custom Controls added.
This action is completed by selecting the blue + button located next to the 3. Controls located on the Edit Task page. Once the below screen is open, select the Custom Control Type from the drop-down menu, enter in the Custom Control in the descriptive text box and then click the blue Add button.

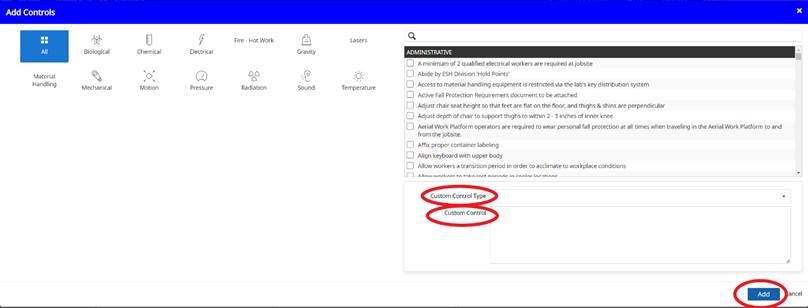
When the Custom Control has been created, it is displayed in italics on both the screen and within the Task Checklist report.
4.3.8 Deleting Non-Required Hazards and Controls
ePAS provides the ability to remove any non-required hazards or controls for the Work Category that was selected for the task being performed. To delete non-required Hazards and/or Controls, click on the red X located next to the non-required Hazard and/or Control. This action will show a strike out where that said item has been removed. If it is required to add that Hazard and/or Control back in, click on the green + button for this action. Once completed, click the blue Save and Close button to move forward.

|
|
Controls added to the THA based on Work Categories or Hazards cannot
be completely removed. Such controls can be deleted if they no longer
apply, but continue to be displayed as |
4.3.9 THA-based Requirements
The THA may be used to determine the following:
· Permit Type
· Required Certificates
· Required Forms
· Requirement for a Formal Risk Assessment
· Required Approvals
· Required Documents
· Hazard Conflicts
· Additional Control Sections on reports
· Competency requirements
When utilizing the Task based THA, ePAS determines THA driven functionality based on the net result of every THA category from every task associated with the current object.
4.3.10 Recipients Tab
The Recipients tab displays the person that the permit will be issued to. ePAS usually assigns the individual creating the Permit Request as the recipient. This can be changed to assign the Recipient in Charge to someone else, generally the individual who will be completing the work.
To remove an existing Recipient:
1. Select the red X from the Actions column to delete an existing Recipient.
2. ePAS presents an acknowledgement screen to confirm the record deletion.
3. Select OK to continue with the deletion or select the Cancel button to abort the process.

To add a new Recipient:
1. Click in the Person field above the Recipients data grid.
2. The Person field provides real time search functionality. Start typing the intended Recipient’s name.
3. ePAS performs a lookup of registered users with the required Recipient system role that matches the text input.
4. Select the desired Recipient from the quick search list.
5. Select the desired System Role from ePAS Role dropdown list. As only one recipient type is currently available, ePAS defaults to this option.
6. Select the blue Add Recipient to add the person as a Recipient.
7. The Recipient data grid lists all recipients currently assigned to the Permit Request.
8. Select the blue Continue to Documents navigation button located on the bottom right-hand side of the screen to navigate to the Documents tab; alternatively, select the Documents tab located in the sidebar of the screen.

4.3.11 Documents Tab
The Documents tab is used to list any required document types (based on the information contained within the THA) along with the actual documents deemed necessary to support the Permit Request and/or Permit requirements.
4.3.12 Adding Documents
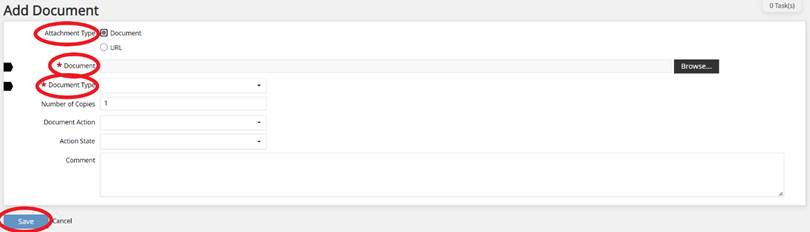
To add either a required or optional document:
1. Select the blue Add button to open the Add Document selection screen.
·
Select
the attachment type from the available options.
·
Use
the Document attachment type to
attach files from the local or network file system.
·
Use
the URL attachment type to attach a
link to a website or internet type document. The document type field changes to
the *URL field. Enter the URL
address.
·
To
attach a document, select the black Browse
button to display the Open
dialogue box.
·
Navigate
using the standard file open dialogue
box to select the file to be added to the Permit Request.
·
Select Open to add the selected file; or
·
Select Cancel to close the dialogue without
adding the file.
·
ePAS displays the name of
the selected file beside the Browse
button.
2. Select the blue Save button to save the document details and add the document to the Permit Request document list; or
3. Select Cancel to close the Add Document screen without adding the selected document.

4.3.13 Deleting Documents
To delete a non-mandatory document,
select the red Delete icon ![]() located in the Action column of the Documents
data grid.
located in the Action column of the Documents
data grid.
|
|
Note
that mandatory documents may not be deleted. In these instances, the delete
icon located in the Actions column
of the Document data grid is
greyed out and not selectable. To replace a Required Document, add a new document as per the instruction
provided previously. Once a second document is added, the original documents
delete icon is updated to red allowing that document to be deleted. |
To open the document to either
preview or print, select the Open
icon ![]() located in the Action column of the data grid.
located in the Action column of the data grid.
Select the blue Continue to Permit Summary navigation button located on the bottom right-hand side of the screen to navigate to the Permit Summary tab; alternatively, select the Permit Summary tab located in the sidebar of the screen.

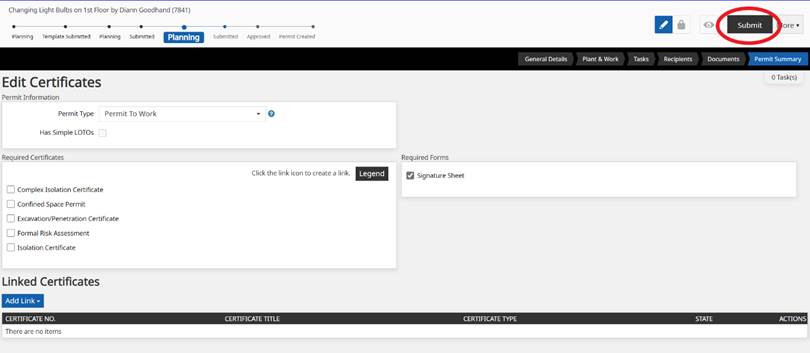
4.3.14 Permit Summary Tab
The Permit Summary Tab is the final step in the Permit Request Wizard.
The Permit Summary tab shows a list of available Permits, Certificates, and Forms.
The Permit Type field defaults to the Permit Type required depending on the THA Work Categories selected. A dropdown list is available when alternative Permit Types may be selected. These alternate permit types include Registered Routine Duty and Minor Works Permit.
The blue Information icon displays information in relation to the Permits. The displayed information is maintainable by customer System Administrators.
Has Simple LOTOs field may be selected where the permit conditions comply with the Simple LOTOs isolations rules and procedures. Selection of the Has Simple LOTOs field opens an acknowledgement popup that the applicant must read and acknowledge prior to submitting the application.
The Certificates section lists all available Certificate Types. Certificates may be automatically selected via the Work Categories selected on the THA. Additional certificate requirements may also be defined at this stage. Certificates automatically selected due to the Work Categories selected may be removed when deemed unnecessary for the body of work. Any selected certificates on the Permit Request will enforce a relationship between the selected certificate type and the Permit generated from the Permit Request.
The Forms section lists all available Forms applicable to the Permit Request. Forms may be automatically selected via the Work Categories selected on the THA. Forms are Managed Documents that are associated with a given Permit. An example of a Form is a Signature Sheet. A Signature Sheet will be produced when the Permit is issued when selected. Additional forms may also be defined at this stage. Forms automatically selected due to the designated Work Categories, may be removed when deemed unnecessary for the body of work.
To finalize the planning of the Permit Request:
1. Select the Permit Type required (in instances where there are multiple Permit Types available). Note: Where there is only a single option, no action is required.
2. Review the Required Certificates section. Select the checkbox(s) for any additional Certificate(s), if required. Some Certificates may already be selected because of Work Categories selected. Note that, when there is a LOTO being performed, both the Complex Isolation Certificate and Isolation Certificate will be checked by ePAS. Make sure to uncheck whichever certificate is not necessary for the work being completed. Therefore, only one certificate will be filled out for the type of work being performed.
|
|
If a Certificate is
added manually at this stage, the necessary Hazards and Controls won’t automatically be applied. Therefore, it is important that due care is taken
where Certificates are manually added. When doing this it may be
necessary to review and update the Work
Categories, Hazards and Controls to ensure these properly meet the scope
of the Permit Request. |
3. Review the Required Forms section. Select any required Forms. The Signature Sheet can be automatically selected depending on Work Categories and the Hazards and Controls that are selected. The user can select additional Forms, if required.
4. The Permit Summary tab is the final step in the Permit Request Wizard. If required, user messages or history notes may be used to record additional information not previously captured on the Permit Request prior to submitting the request.
5. Once completed with the Permit Summary section, hit the black Submit button on the upper right-hand corner to move into the final approval for the Permit Request state.
4.4 Approve the Permit Request
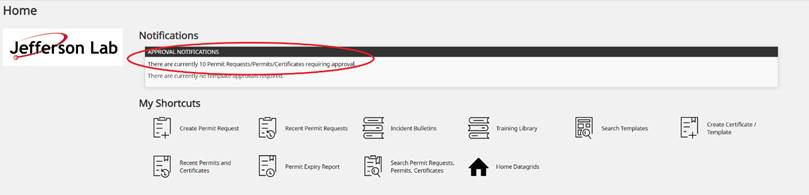
The Permit Request is now ready for review and approval. Once it has been assessed as complete and correct, it must be approved to proceed to the next step in the process, that is, an approved package of work for which a Permit may be created. Once the Submit button is selected, ePAS will automatically return to the home page to retrieve the Permit Request for approval.
4.4.1 Retrieve Submitted Requests
· Submitted Permit Requests can be located via:
o Utilizing the Approval Notifications shortcut located on the My Shortcuts home screen. This will read There are currently # Permit Request/Permits/Certificates requiring approval.
o Click on this sentence to access recent permit requests that require approvals.
4.4.2 Approvals
· The Permit Request can only be approved by users:
o Holding the Permit Request Authorizer System Role in the relevant Responsibility Group.
o Meet the criteria of Planner Cannot Approve or Planner Can Approve. This is defined against each approval within ePAS.
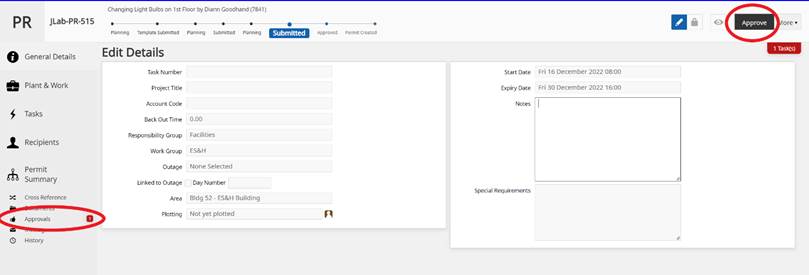
· To approve a Permit Request:
o Retrieve the Permit Request from the home page and enter into the Permit Request to continue forward in the approval process.
o The request must be in the State of Submitted that will be shown in the blue task bar next to the Permit Request number.
o The logged in user must have the required system role.
o Access the Approvals tab. This may be achieved by selecting the Approvals tab located in the sidebar, which will have a red 1 associated next to Approvals or by selecting the black Approve button located in the upper right-hand corner of the page.
|
|
Should the logged in user not have the required System Role
and/or competency to process the Approval, the Approve action button will be greyed out. Hovering over the Approve action button provides
information to the user as to why they cannot process the approval. The Approvals tab also indicates that the
logged in user does not have the required role. |
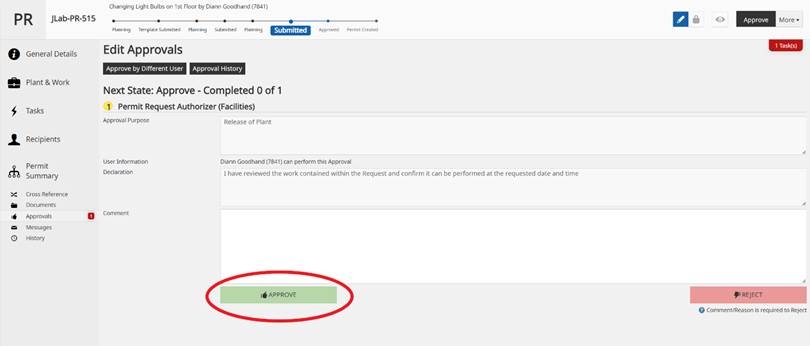
· The Approval screen indicates:
o The System Role required to process the approval.
o Approval Purpose text.
o
Any competencies required by the approver to
approve the Permit Request.
o User Information – This indicates whether the signed in user may or may not perform the approval. In this case, the creator has permission to also perform the approval.
o Declaration text.
o Comments inserted during the approval or rejection process.
o Approval History button – The selection of this button will show full history of previous approvals and approval rejections
The approval may be processed following a review of the Permit Request. In instances where there is insufficient or incorrect information, the Permit Request may be rejected and returned to Planning, if required. Rejecting the Permit Request may generate an email to the Permit Requester (this is the person that submitted the Permit Request) detailing the reason for the rejection. The Permit Request must then be actioned and resubmitted for approval.
4.4.2.1 Process an Approval
When satisfied that the Permit Request is complete and correct, the approval can be processed.
· To process an approval:
o Enter any comments relevant to the approval in the Comment field, if required. This is optional when processing an approval.
o Select the Approval Button located at the bottom of the screen.
o The approval is updated to the status of Approved.
o The Permit Request moves to the state of Approved.
The Request state is updated to Approved. Full details of all approvals and rejections are available via the Approval History button located on the Approvals tab and are also fully documented on the History tab.
This finalizes both the Planning and Approval process for the Permit Request.
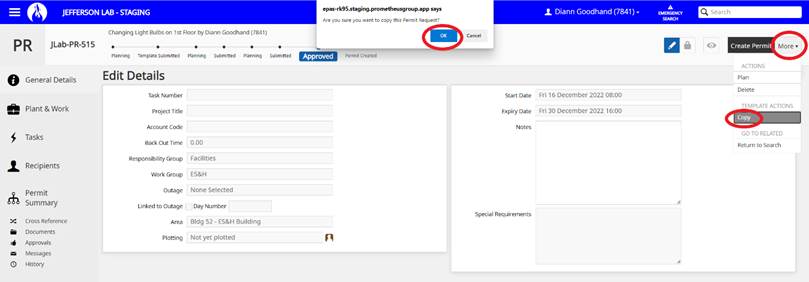
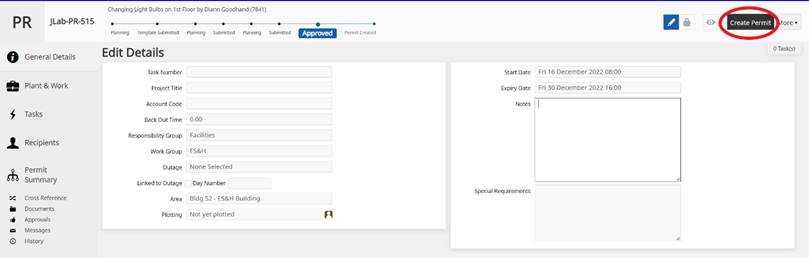
· The available Actions from the Approved state are:
o Create Permit - Creates the Permit from the approved Permit Request.
o Plan - returns the Permit Request back to the Planning state for further review and action. Once updated, the Permit Request must be submitted again.
o Delete - Provides the ability to delete the Permit Request should it be deemed not to be required.
o Copy - Provides the ability to copy the Permit Request to a new Permit Request.
4.4.2.2 Reject an Approval
· To reject an Approval:
o Enter a reason for rejecting the Approval in the Comment field. This is a mandatory requirement and provides the ability to define the reason for the rejection.
o Select the Reject button located at the bottom of the screen. The approval is updated to a rejected status.
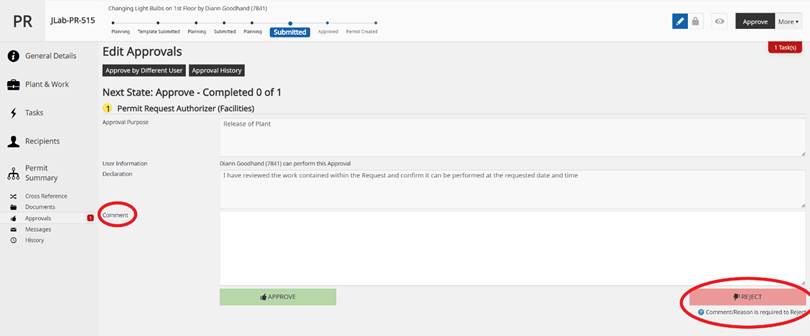
The approval rejection may be reset by selecting the blue arrow and confirming the reset in cases where no changes are required. In cases where changes are required, the Permit Request should be returned to Planning.
If the Permit Request is rejected, then this is usually because of insufficient or incorrect information. An email notification is generated and sent to the Permit Requester advising of the rejection with a reason for the non-approval. The Permit Requester then sends the Permit Request back to Planning to revise and update the information to address the identified issues. The Permit Request is then submitted for approval again.
An example of an email generated when the approval is rejected is displayed below:

Once approval on the Permit Request has been granted, the permit can then be created, with ePAS automatically copying all the information entered into the Permit Request to the Permit. This process removes the need to re-enter this data and reduces errors.
4.4.3 Copying an Existing Permit Request
As an alternative method of Permit Request creation, ePAS provides the ability to copy an existing Permit Request to use as a basis for a new Permit Request. The Permit Requester searches for a previously created Permit Request, which covers the same (or similar) work on the same plant item.
When the appropriate Permit Request has been found, ePAS provides the ability for the user to copy the details and create a new request containing the same information.
This information can then be reviewed and modified to meet the requirements of the current work task. Once the information has been reviewed and any additional data entered, the Permit Request is submitted, and follows the same workflow as the manual creation method.
The Copy process allows the user to recreate the exact requirements of that work without the need to enter all the information manually. This process reduces keystrokes and errors and improves the consistency of approach to the work.
The Copy Permit Request functionality provides an efficient method of creating a new Permit Request.
The Copy process allows the user to recreate the exact requirements of that work without the necessity of entering all the information manually. This process reduces keystrokes and errors and improves the consistency of approach to the work. The Permit Request may then be edited to reflect the exact requirements of the new body of work.
|
|
The
ability to copy a Permit Request is available during all states of the Permit Request by default. This may be updated via the setting “Valid
states for Copying an Application” to limit the states in which a Permit
Request may be copied. |
4.4.3.1 How to Copy an Existing Permit Request
· Locate the existing Permit Request from either selecting the home screen button Recent Permit Requests or by selecting the home screen button Search Permit Requests, Permits, Certificates. This will allow a search of an Existing Permit Request where work has already been completed.
· Once the desired Permit Request has been located and opened, on the upper right-hand side select the More button that has a downward associated arrow. This will open additional selections that are allowed for the selected Permit Request.
· In this drop-down menu, select the Copy button to accurately copy the existing Permit Request. An acknowledgement will drop down regarding the required action. Select OK to continue with the process.
· Once the above actions are taken, this will open up a new Permit Request, with the originally copied Permit Request’s details, and adjustments can be made to fit the work being performed.
The new Permit Request is created in the State of Planning with fields. automatically populated
with available data from the original Permit Request. The new Permit Request may be edited,
as required.
The History tab displays detailed history
of the creation of the Permit Request. The new Permit
Request may now be edited and processed in the normal manner.
4.4.4 Amend Permit Request
When a Permit using the Task-Based THA undergoes the Amend Permit Request, the tasks on the Permit Request are removed and replaced by the tasks from the Permit. When the Permit Request moves forward and updates the Permit the Tasks on the Permit, they will be removed and replaced by the Tasks from the Permit Request.
When a Permit using the Task-Based THA undergoes the Amend Permit Request the tasks on the Permit Request are replaced by the tasks from the Permit. When the Permit Requests moves back through the workflow the permit, it is updated, and the original tasks are updated with the tasks from the amended Permit Request.
4.4.5 Task on Revisions
When a Permit or Certificate is revised and a new revision created, the tasks from the original revision are copied to the new revision. Changes to tasks on a subsequent revision are not reflected on previous revisions. Each revision will have its own tasks that can be changed when in the Planning state, as required.
4.5
Delete
the Permit Request
The Permit Request may be deleted at any time prior to permit creation.
· To delete a Permit Request:
1. Select the Delete action listed under the More button.
2. Enter a reason for deleting the Permit Request in the Notes field and select Continue to finalize the deletion process.
3. Alternatively, selection of the Cancel option will abort the deletion of the Permit Request.
The Permit Request state is updated to Deleted and the user is navigated to the Shortcuts Home Screen. Once deleted, the Permit Request no longer appears in the Recent Permit Request menu, but may be located by conducting a search for deleted Permit Requests, if required.
4.6
Creating
the Permit
The Permit Request is now ready
for the final step of creating the Permit.
When this process is initiated ePAS
will create the Permit Type as
defined on the Permit Request.
The permit may only be created by a user with the applicable Permit Issuer system role.
To create a Permit:
1. Select the Create Permit button.
2. The Permit is created and the user is navigated to the Permit Record.
3. To view the Permit Request details, select the Permit Request option listed under the More button located at the top right-hand corner of the screen.
4. To view the linked Permit Request, select the Permit Request option listed under the More button.
5. To navigate back to the Permit record from the Permit Request select either the Navigate Back or Permit option located under the More button.
5.0
Revision History
|
summary |
date |
|
|
0 |
new manual |
04.01.2023 |
|
|
ISSUING
AUTHORITY |
TECHNICAL
POINT-OF-CONTACT |
DATE |
REVIEW
CYCLE |
rev |
Page 48 of 48 |
|
|
|
ES&H Division |
04.01.2023 |
3 years |
0 |
|